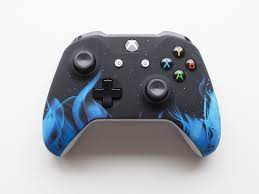
In this article, you will learn how to take apart your Xbox One controller and customize it to suit your personal style. By following these simple steps, you can transform your controller into a unique gaming accessory that reflects your individuality.
With just a few tools and materials, you can disassemble the controller and gain access to its various components. From there, the possibilities are endless. You can customize the controller shell, add personalized buttons and triggers, and even install custom thumbsticks and D-pad.
Once you have completed your desired modifications, you can easily reassemble the controller and start enjoying your newly customized gaming experience.
So, if you’re ready to take your gaming to the next level and put your personal touch on your Xbox One controller, let’s get started!
Key Takeaways
- Disassemble the Xbox One controller to access its components
- Customize the controller shell, buttons, triggers, thumbsticks, and D-pad
- Purchase replacement buttons and triggers for personalization
- Test the functionality of all the customized components and features
Gathering the Necessary Tools and Materials
Get ready to dive into the world of DIY customization by gathering all the essential tools and materials you’ll need to take apart your Xbox One controller!
First, make sure you have a small Phillips screwdriver, preferably magnetic, to easily remove the screws from the controller. You’ll also need a plastic prying tool or a thin flathead screwdriver to carefully pry open the controller without damaging it. Additionally, grab a pair of tweezers to handle small components and screws.
To keep everything organized, have a small container or tray to hold the screws and parts as you remove them. Lastly, if you plan on customizing the controller’s appearance, gather your chosen paint or vinyl wraps, as well as any decals or stickers you want to apply.
With these tools and materials in hand, you’re ready to embark on your Xbox One controller customization journey!
Disassembling the Xbox One Controller
Start by carefully removing the outer casing of your Xbox One controller to access its internal components for personalizing your gaming experience. To do this, you’ll need a small Phillips head screwdriver. Look for the screws located on the back of the controller and use the screwdriver to unscrew them.
Once the screws are removed, gently pry open the controller using a plastic opening tool or your fingers. Be careful not to apply too much force to avoid damaging the controller.
As you open the controller, you’ll see the circuit board, buttons, and other internal components. Take note of the buttons’ positions and the way they’re connected to the circuit board, as this will be important when customizing your controller.
Customizing the Controller Shell
To truly make the controller your own, imagine the excitement you’ll feel as you transform its shell to reflect your unique style and personality. Start by carefully removing the back battery cover and the five screws holding the controller together.
Gently pry open the shell, being careful not to damage any of the internal components. Once the shell is off, the possibilities are endless. You can paint it in your favorite colors, add decals or stickers, or even experiment with different textures like matte or metallic finishes.
Don’t forget to personalize the buttons and triggers too! You can swap them out for different colors or even add custom engravings. With just a little bit of time and creativity, you’ll have a controller that stands out from the rest and truly represents you.
Adding Personalized Buttons and Triggers
Enhance your controller’s uniqueness by personalizing the buttons and triggers, giving them a distinct look and feel that perfectly matches your style.
Adding personalized buttons and triggers is a simple yet effective way to customize your Xbox One controller. Start by purchasing replacement buttons and triggers that come in different colors or designs. To remove the existing buttons and triggers, gently pry them off using a small tool like a flathead screwdriver.
Then, align the new buttons and triggers with the corresponding slots on the controller and firmly press them into place. Make sure they’re secure and properly aligned.
Once you’ve finished installing the personalized buttons and triggers, test them out to ensure they function properly. Now, you’ve got a customized controller that reflects your own unique personality and gaming style.
Installing Custom Thumbsticks and D-Pad
Once you’ve acquired replacement thumbsticks and a custom D-pad, effortlessly elevate your controller’s appearance by installing them with precision and finesse.
Begin by removing the old thumbsticks and D-pad using a small Phillips screwdriver. Carefully unscrew the screws holding them in place and gently lift them out.
Take your new thumbsticks and align them with the holes on the controller. Press them firmly down until they snap into place.
Next, take your custom D-pad and align it with the directional buttons on the controller. Gently press it down until it fits snugly.
Finally, tighten the screws to secure the thumbsticks and D-pad in place. Test the buttons and thumbsticks to ensure they’re working properly.
Enjoy your newly customized Xbox One controller with its fresh thumbsticks and D-pad.
Reassembling the Xbox One Controller
Now that you’ve successfully upgraded your controller’s appearance, it’s time to put all the pieces back together and get ready to dominate your gaming sessions.
Begin by carefully placing the circuit board back into the front shell, ensuring that all the buttons are aligned correctly.
Gently press the thumbsticks back into their slots until they click into place.
Take the D-pad and snap it back into its designated area.
Next, reattach the triggers and shoulder buttons, making sure they’re secure.
Carefully align the back shell with the front shell and snap them together, ensuring that all the clips are engaged.
Finally, use the screws you saved earlier to secure the controller back together.
Once everything’s tightened, give it a test run to make sure all the buttons and features are working properly.
Your newly customized Xbox One controller’s now ready for action!
Frequently Asked Questions
Yes, you can use any type of screwdriver to disassemble the Xbox One controller. Just make sure it fits the screws properly to avoid damaging them.
To ensure your safety while disassembling the Xbox One controller, it’s important to take certain precautions. Avoid using excessive force, wear protective gloves and goggles, and work in a well-ventilated area to prevent any potential hazards.
No, you cannot customize the buttons and triggers on your Xbox One controller without disassembling it. To make any changes to the controller’s buttons and triggers, you will need to take it apart.
Yes, it is possible to add LED lights to the Xbox One controller shell during the customization process. You can easily find LED light kits online that are specifically designed for Xbox One controllers.
Yes, you can use a different brand of thumbsticks and d-pad when installing custom ones on your Xbox One controller. Just make sure they are compatible with the controller’s design for a smooth fit.
Conclusion
In conclusion, taking apart your Xbox One controller for DIY customization can be a fun and rewarding project. By gathering the necessary tools and materials, disassembling the controller, and customizing various parts like the shell, buttons, triggers, thumbsticks, and D-pad, you can create a personalized gaming experience.
Just remember to take your time and follow the steps carefully to ensure a successful reassembly. With a little effort and creativity, you can transform your controller into a unique and customized gaming accessory.